Hi guys. Andrew here from Accelerate Auto Electrics & Air Conditioning.
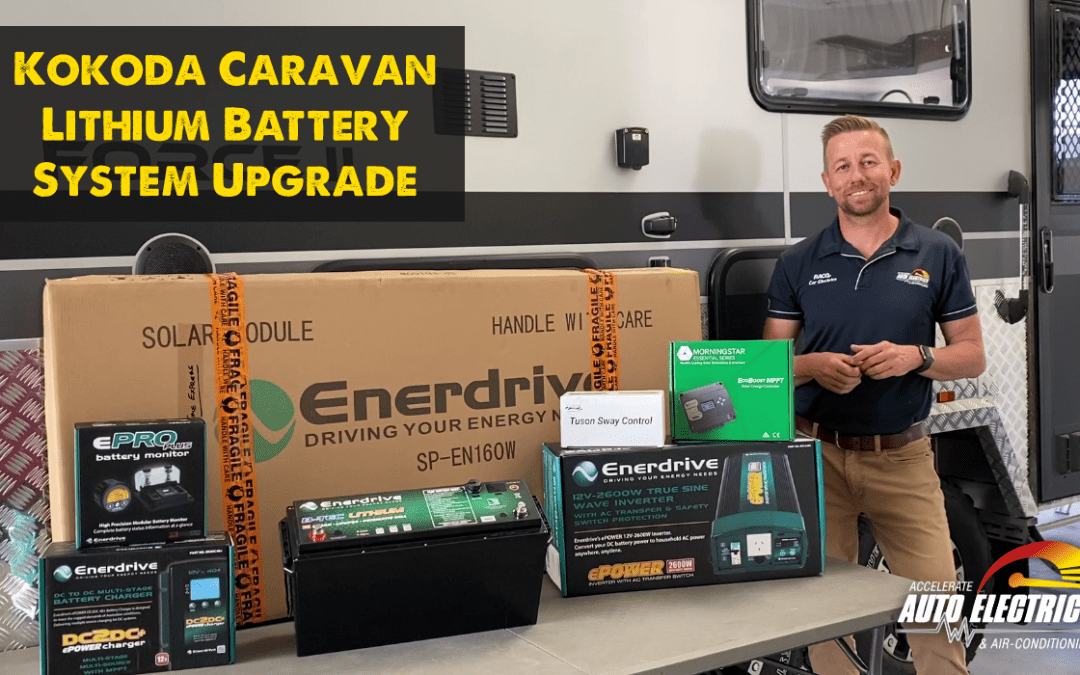
In this video, we’re gonna give you a full run through of converting this Kokoda Force 2 from AGM, to a full off-grid lithium system. We’re gonna show you what component we’re using in each location, why we’re fitting it there, and what it does.
So come on, come inside and we’ll show you what’s going on before we start, and then we’ll give you a run-through as we go.
So here we are inside the Kokoda. I’m gonna give you a run-through pretty much what it’s got, to start off with, so what we’re working with, what we’re gonna add and where we’re gonna add it and try and explain kind of our thinking behind where we’re gonna put things. So we’ll start off here. We’ve got a standard sort of control cupboard that most vans have got. Up there we’ve got I think it’s a 30 Amp PWM solar regulator. That was fine cause it had two 150 watt panels, so 300 watts, but we’re gonna upgrade
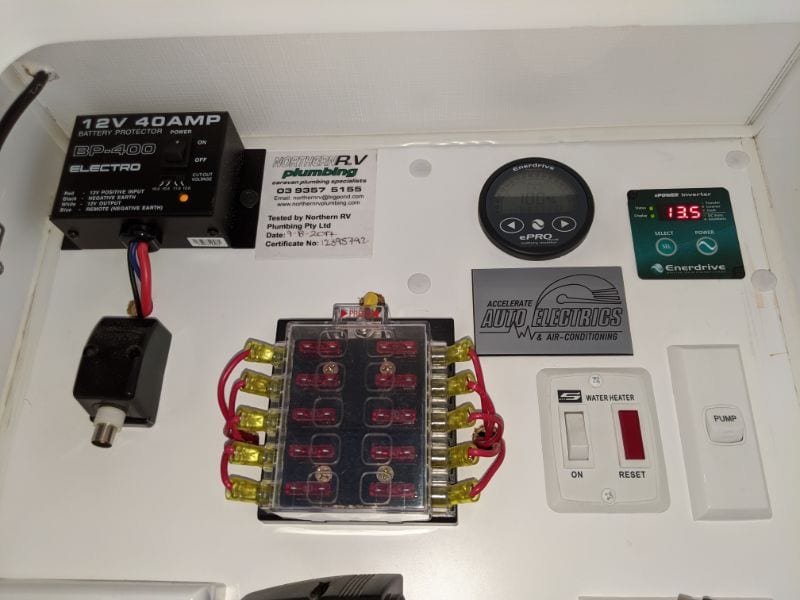
it to this bad boy here. This is the Morningstar EcoBoost 40 Amp MPPT regulator. And the other thing we’re gonna do is we’ve got a 40 Amp, that’s a BP-400 battery protector. So that’s designed to cut the voltage out when it drops low with the AGM batteries. Obviously cause we’re converting it to lithium,
and it’s got a lithium battery, it’s got a constant voltage that becomes redundant, so we’ll probably remove that. We’ll definitely disconnect it but we’ll see how we go once we’ve jiggle everything around in there. Whether we remove it or leave it there to take up the space but make it redundant.
What we’re definitely gonna put in there is this awesome bit of gear. So this is an Enerdrive ePRO. So this is a little gauge, and it’ll control and show everything that’s happening in the system, and give the owners full run down of how much power they got left, how much they’re using, and how it’s working, to be honest.
Moving further through the van, this is gonna be a bit hard to show but we’ll wing it. We’ve got a whole couch area here. You can see I’ve put some stuff there. So at the moment, we’ve got a hot water system and then beside it, we’ve also got the there’s a Voltech 40A AC to DC charger.
So we’re gonna reuse it. We can reprogram it to lithium. This band’s gonna spend the bulk of its time off grid, so the charge is not really gonna do much, so we’ll just stick with one we’ve got, reprogram it. Will probably move it cause we’re gonna have to jiggle everything around in here but it’ll do the job.
What we’re probably gonna do is, seeing as it’s going under the seat, will remote mount the on-off switch, and hopefully we’ll put it back up in that cupboard. So when the van is off grid, the customer can turn the AC charger off, so we’re not perpetually trying to charge the batteries from the solar, through the AC charger. Obviously, we’ll just use the solar regulator.
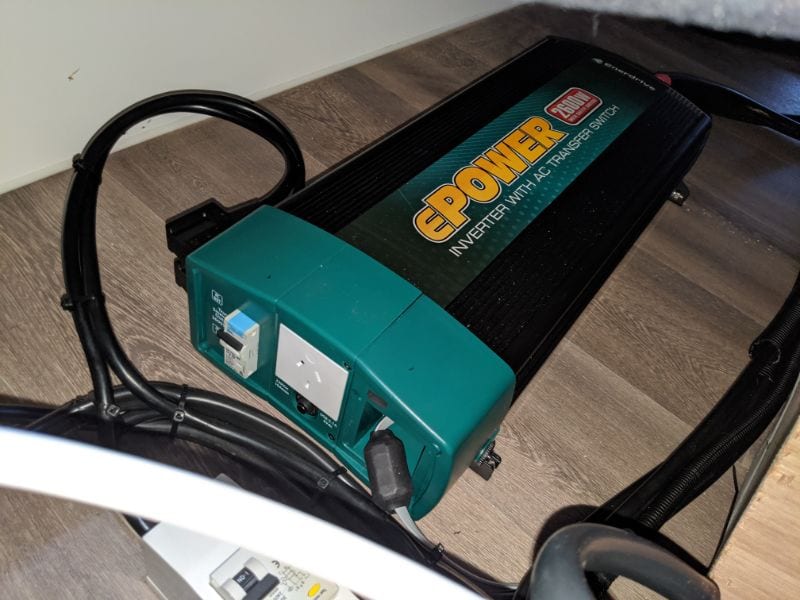
So I’ve put that there. So there is our 200 B-Tech at 2600 watt inverter, and I’m doing a backwards, DC-DC charger. So they’re all gonna fit in this base under here. We’ll leave room for a second 200 B-Tech, I’d say we’ll probably end up fitting that at a later date. This will get us going at the moment.
We’re probably gonna have to cut a…There’s no opening here at all, so we’ll probably modify underneath the seat to give us some room.
Here we are up on the roof of the van. The two 150’s that are down the front there, that’s what it currently had, and here you can just see we’ve set one of the 150’s here, and we’re gonna fit another one there. So that’s gonna give us a total of 600 watt solar on the roof.
So here we are outside the van. The batteries currently are in these two cases here. What we’re probably gonna do, if you can see… I’ll get a close up. It’s a bit of a disaster with a heap of multiple fuses. So what we’ll do, we’ll either pull all this back into the van and man a fuse box in there or if that’s too problematic, we’ll mount a fuse box under here with some bus bars and run everything up inside the van. So obviously a battery now is going inside. The reason why we’ve chosen inside is, these are welded, it’s not going to sit very well in here. If we remove these boxes, we get more clearance, and the other reason is that, if we mount the battery inside next to the inverter, we’ve got a much shorter run between the battery and the inverter which is gonna help our efficiency and output of the inverter.
So here we got our two 150W Enerdrive panels. We’ll start with them. We’ll get them fitted first. The reason why we’ll fit them first is, mainly to allow plenty of time for the glue to set. So we get them up there, get them glued down and then that way we can continue on with the rest of the job, knowing the glue is setting and we can get the van back to the customer as quickly as we can. To get them ready,
we’ve put 50 by 50 aluminium front and rear and then we’ve inverted some aluminum on the inside. So these would be our glue down points. We’ll also glue down the centre points but the centre points are just a bracing. Once we get up on the roof, we’ll show you gluing them down. It’ll become apparent why we’re gluing in front to rear and supporting them in the middle. It’s just really a space issue. We haven’t got much width, but we’ve got plenty of length. With them set up this way, they’re gonna fit up there really well. And we’ve got a nice flat surface to work with, so it means we can set up the legs before we put it up there. If we had a curved roof, we’d have to set up the legs up there, but this one’s a nice easy one. We got a flat roof, we’ve wired them up, we’ve done everything, aluminum and so on. We’ll get them up there, get them glued down, let the glue set while we move on with the job.
So that’s one solar panel glued on, now we go to another one.
Guys here we are inside, Jeff being super-speedy Jeff has beat me to it and he’s already got the old solar controller off. We’re definitely gonna mount the Morningstar now in that other cupboard, but we’re gonna bring the wires through into the other cabinet behind the board. The reason why we’ve done this is, this board here is actually glued in and like everything with these jobs, we need to sort of deal with what we’ve got. So rather than hacking up your board and making a mess, we’re gonna come in from this side. And then the other thing we’ve done is, we’ve removed the microwave here, we’ve found access in there. So this means we can bring wires from both sides. We’re gonna use the fridge cavity and microwave to bring everything up from underneath, and come in from this side with all the cabling, and then we’re gonna bring out solar control cabling through to the other side. And if we mount it far back, they’re not gonna lose any cupboard space. It means that we can get now behind here for all that wiring cause we’ll have a hole on either side and that’s pretty much it.
Well, I know I said we were gonna do a bit more of a run through but like always happens around here, we got busy and my guys just got in and got the job done. So here we are at the end, but I’ll take my time to go through with what we’ve done.
So we’ll start at the very front. So the first main things you’ll see is, we’ve put two Anderson Plugs on them. So what we did to try and cheat a bit, we utilised the original Anderson wiring, which was 8 B&S. We’ve now used that for the ESC cause we had that cable running down anyway. And because we’ve put a big lithium system in, 40 amp charger and obviously the battery will take all that charge, we’ve run a 6 B&S Anderson cable. We’ve run that all the way down to the very rear, which will take you down and show you. So this is around the full length and we’ll also upgrade the wiring on the vehicle. The customer’s got a Land Cruiser, so we’ll upgrade that wiring on there so that the battery can get its full charge. Pretty much that’s all that’s here to see at the front. So we’ll move down to where we had the batteries.
So here we are down where the batteries were and now all we’ve got is two empty boxes. So the customer will probably chop them off to increase his departure angle on the van, or he could use them for storage for tools or something like that. All we’ve done, where the cable was coming down and linking in here, we’ve just extended the cables and run them inside. So to be honest there’s nothing to see here but empty boxes.
Alright guys, here we are inside the van. Now we’ve done a beautiful installation on this one, which makes for a great customer experience. Everything’s tucked in hidden away but makes for a terrible video. So we’ll have to get Toni to move around a bit and show us what’s going on.
So the first thing I guess we’ll show you is up in here, in the cabinet. If you remember, we had the old dodgy solar control I think I’ve got it down here. So this old thing here. We’ve removed it. We’ve installed an ePRO Battery Monitor, that’ll carry out all our monitoring. And then we’ve also installed, the Enerdrive 2600 watt inverter remote control and a bit of shameless branding, which has also been great for covering up the holes in the unit.
The next thing over, because obviously we needed a place for the solar controller, we’ve mounted this, Morningstar 40 amp MPPT EcoBoost solar controller. So the reason why we’ve put it up here and not down low is because that’s where all the wires were junctioning and it just made for a much neater installation. All the cabling was a good size and it was great place to put it. You can see we’ve tucked all the wires behind. We’ve chased them through here and they all go down behind the fridge. So, there’s no external wires we’ve had to fit on this van. Everything’s back in its original spot.
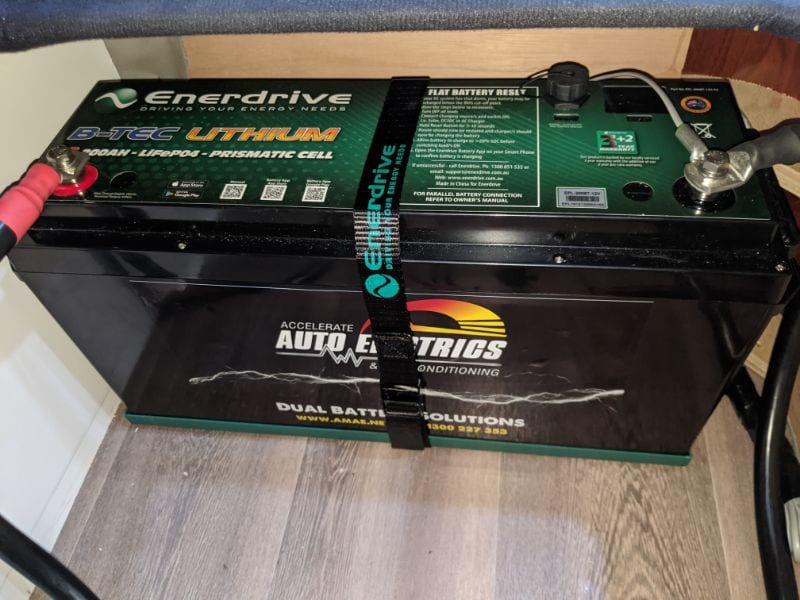
Now I’ll do a walk around just to make it hard for Toni. So, what we’ve done here is over in this corner, we’ve fitted the Enerdrive 200 Amp B-Tech lithium battery. We’ve spaced it right back and that’s because we’ve got another flat surface right beside it now that we can fit a second one if the customer wants it. In everything we do, we try and have it so that we can upgrade it at any time. Nothing here is underrated in this job. Everything’s pretty much over-gunned for the battery and the solar panels, so anytime he can upgrade it and away he goes.
Underneath the seat here, we didn’t end up cutting the hatch like we were talking about it, because to be honest, we just didn’t have to. We’ve fitted the 2600 watt inverter right under here. We’ve used the factory Enerdrive cabling that they get with us. Fantastic. Comes with the big fuse, perfectly rated cable. So that’s then being wired in to the RCD that’s fitted under here. We’ve retained the customer’s original 240 volt charger, we’ve just reprogrammed it with a lithium profile, and we’ve used the Enerdrive DC-DC charger that’s handling that Anderson cable that you saw come from the front, through the DC-DC charger and off to the B-Tech.
So we’re about to show you down in the whole. Basically what we’ve got here, if you want to go down there, we’ve fitted the Enerdrive B-Tech 200 Amp down here, utilising their tray and that’s the actual new tray and this is the series two B-Tech that comes with an auto restart button. So if it does run flat, it’ll actually restart itself. A cool feature in the new batteries. So what I failed to mention before is the ePRO runs a shunt. So that thing you can see there is the shunt, and that measures all the power flowing through the van and gives it’s readings for the ePRO.
So before when we were out at the front of the van, I just touched on that red Anderson plug and how we’d utilised the cable. What I forgot to mention, we fitted ESC to this van. So that’s Electronic Stability Control. So what that means is, this quite a large van, if it does get a sway up, the stability control will kick in turn the brakes on and off either side, bringing the sway under control and keep the van towing in a straight line. So it comes out factory on most vans now and is definitely an exceptional safety feature. I think this van was just would have missed the cut off of being fitted, so we’ve retrofitted it to the van now. We’ve used a BMPRO stability control and that’s very similar in operation to the Dexter, which you’ll see more about if you do some googling.
So in a nutshell, what we’ve done with this three year old van is, we’ve brought it up to the modern. So we’ve got it charging faster, we’ve got more capacity, we’ve got full off grid capability, and probably more importantly, we’ve made it a lot safer to tow.
So if you wanna improve your van, give us a call 1300 227 353, shoot us an email [email protected] or will click on the link below.